I cut some CTMH cranberry sheer ribbon to make the handle, looping the ribbon and attached it to the center front of the box. Then, I cut CTMH B&T paper from a Christmas pack to 7.5" x 10.5" and used red tacky tape to attach around the box. The decorative strip was cut at 7.5" x 1" and used a Martha Stewart border punch on it and attached with adhesive.
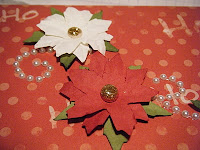
The top of the box is decorated with "Say it with Pearls" from Want 2 Scrap and 2 red and 2 white paper poinsettias, "Christmas Blossoms" from Making Memories and glitter glue was added to each center brad.
To cover writing on the inside of the box, a piece of B&T is cut at approx. 6" x 7" and taped from the top of the lid to the botton of the box. The divider for the inside of the box is made from a piece of red cardstock cut at 3.5" x 12" and scored at 2.25", 3.5", 4.75", 7.25", 8.5", and 9.75". Fold at the scored lines and place tape on the bottom to hold in place. I finally finished this project up by cutting 24 gift tags at 2 1/8" x 3.5", decorating them, and putting a silver cord through a center hole punch. The cord made the tags a little bulky and I think the twine used on the inspiration blogs would work better. I gave the completed project to a friend as a early gift to help with Christmas gift giving. All of my measurements were approximated on the box I used and may need to be adjusted to the box you use.


That is awesome and wow a lot of work.. Very very nicely done..tfs!
ReplyDeleteWOW! I love this!
ReplyDeleteThis comment has been removed by the author.
ReplyDeleteVery very nice. I love the box. Those boxes are just great for all cartridge storage.
ReplyDelete