The idea for this chest was inspired by projects designed by Laura Denison and Kathy Orta.
Cutting dimensions for chipboard:
Bottom Box: 2 pieces - 8.5" x 11"
1 piece - 2" x 11"
2 pieces - 2" x 8.5"
Bottom Drawer: 1 piece - 8.5" x 10 15/16"
1 piece - 11" x 1 7/8"
2 pieces - 8.5" x 1 7/8"
Middle Box: 4 pieces - 8.5" x 5.5"
4 pieces - 2" x 5.5"
1 piece - 8.5" x 2"
Middle Drawer: 2 pieces - 8.25" x 5.25"
2 pieces - 8.5" x 2"
4 pieces - 8.25" x 1 5/8"
4 pieces - 5.25" x 1 5/8"
Top Section: 2 pieces - 4.25" x 11"
2 pieces - 4.25" x 8.5"
1 piece - 8.5" x 11"
Lid: 2 pieces - 8.5" x 2"
2 pieces - 11" x 2"
2 pieces - 8 3/8" x 2.25" - interior pieces to fit into top section
2 pieces - 10 7/8" x 2.25" - interior pieces to fit into top section
Hidden Boxes in Lid: 2 pieces - 8 3/8" x 2"
2 pieces - 8 3/8" x 1.5"
Slats on chest lid: 11 - 12 pieces: 1" x 11 5/16" (approximately) - verify length after lid is built
Pirate chest shape: Cut 3 pieces. Picture with dimensions below.
I used construction strips from kraft colored cardstock. I cut several pages of strips measuring 3/4" x 11" scored at 3/8". I then used 1/4" score tape to adhere the strips to the chipboard to hold everything together.
The following pictures are what I took as I made the chest:
The first 2 pictures are of the bottom layer of the chest.
The next 5 pictures are how I made the middle layer of the chest.
The next pictures are when I added the bottom 2 layers of the chest to the top layer.
Lining in the bottom drawer, measure for dimensions of patterened paper. I used Barnyard paper from The Paper Studio.
Starting the "Pirate Chest" lid:
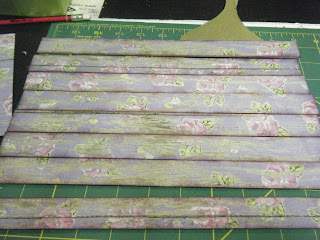
On the lid slats, I covered both sides with patterned paper before adhering to lid.
I started with just the ends in the shape I wanted, but found that the
length was too long for the "wooden slats" across the top, so I added
a middle support.
I also added additional support at the ends that included a
"hidden compartment" of sorts!
Inside view:
For a finishing touch, I cut metallic paper 2.5" x 1.5" (adjust these measurements to your style) scored in the center and then used a corner punch for a bracket look and put 2 brads in each piece. This idea was Laura Denison's from her
"In Flight" pattern.
My niece with her Graduation present!
Thanks for stopping by!


No comments:
Post a Comment